How to Host Strapi in Docker with a Load Balancer
Strapi is a effective headless CMS, and Docker makes it incredibly clean to run it anywhere.
In this guide, we’ll build a production-like Strapi setup using Docker, whole with:
- Strapi API container
- Postgres database field
- Nginx reverse proxy
- Nginx load balancer
- Ability to scale Strapi to more than one packing containers
By the stop, you'll have a fully purposeful load-balanced Strapi environment — splendid for gaining knowledge of, neighborhood development, and writing CI/CD workflows.
What You Will Build :-
Your final Docker architecture:
Client → Nginx (Load Balancer) → Multiple Strapi Containers → Postgres
You’ll be able to scale Strapi like this:
docker compose up -d --scale strapi=3
And the load balancer will automatically distribute traffic.
GitHub Repository :-
Full source code is available here:
https://github.com/NishantArroact/strapi-docker-loadbalanced-architecture
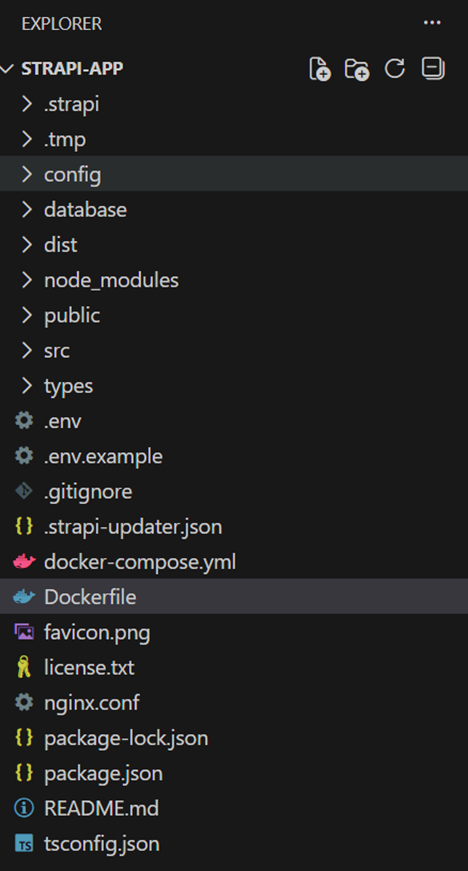
Step 1.Project Structure:-
Your project folder look like this :
strapi-app/
|-- config/
|-- src/
|-- public/
|-- components/
|-- Dockerfile
|-- docker-compose.yml
|-- nginx.conf
|-- package.json
|-- .env.example
Step 2.This file builds your Strapi production image:-
Your project folder look like this :
FROM node:20-alpine

WORKDIR /app

RUN apk add --no-cache python3 make g++ libc6-compat

COPY package.json package-lock.json* yarn.lock* ./

RUN if [ -f yarn.lock ]; then yarn install --frozen-lockfile; \
    elif [ -f package-lock.json ]; then npm ci; \
    else npm install; fi

COPY . .

RUN npm run build

EXPOSE 1337

CMD ["npm", "run", "start"]
Step 3.Create file: docker-compose.yml:-
This file defines all offerings: Strapi, Postgres, and Nginx load balancer.
services:
    strapi:
        build: .
        env_file:
            - .env
        restart: always
        environment:
            NODE_ENV: production
            HOST: 0.0.0.0
            PORT: 1337
            URL: http://localhost:8080

            # DB config for Docker
            DATABASE_CLIENT: postgres
            DATABASE_HOST: db
            DATABASE_PORT: 5432
            DATABASE_NAME: strapi
            DATABASE_USERNAME: strapi
            DATABASE_PASSWORD: strapi_pwd

        expose:
            - "1337"

        depends_on:
            - db

        networks:
            - strapi_net

expose:
    - "1337"
depends_on:
    - db
networks:
    - strapi_net

db:
    image: postgres:16-alpine
    restart: always
    environment:
        POSTGRES_DB: strapi
        POSTGRES_USER: strapi
        POSTGRES_PASSWORD: strapi_pwd
    volumes:
        - strapi_db_data:/var/lib/postgresql/data
    networks:
        - strapi_net

nginx:
    image: nginx:alpine
    restart: always
    volumes:
        - ./nginx.conf:/etc/nginx/nginx.conf:ro
    ports:
        - "8080:80"
    depends_on:
        - strapi
    networks:
        - strapi_net

networks:
    strapi_net:

volumes:
    strapi_db_data:
Step 4.Create new file: nginx.conf (Load Balancer):-
Here load balancing happens.
events { }
http {
  upstream strapi_servers {
    server strapi:1337;
  }

  server {
    listen 80;
    server_name _;

    location / {
      proxy_pass http://strapi_servers;
      proxy_set_header Host $host;
      proxy_set_header X-Real-IP $remote_addr;
      proxy_set_header X-Forwarded-For $proxy_add_x_forwarded_for;
      proxy_set_header X-Forwarded-Proto $scheme;
    }
  }
}
Explanation:
- upstream strapi_servers → All Strapi containers
- server strapi:1337; → Docker DNS assigns all scaled containers to strapi
- Nginx will automatically round-robin traffic to each Strapi replica
Step 5.Environment Variables (.env.example):-
HOST=0.0.0.0
PORT=1337

APP_KEYS="toBeModified1,toBeModified2"
API_TOKEN_SALT=tobemodified
ADMIN_JWT_SECRET=tobemodified
TRANSFER_TOKEN_SALT=tobemodified
JWT_SECRET=tobemodified
ENCRYPTION_KEY=tobemodified

DATABASE_CLIENT=postgres
DATABASE_HOST=db
DATABASE_PORT=5432
DATABASE_NAME=strapi
DATABASE_USERNAME=strapi
DATABASE_PASSWORD=strapi_pwd
DATABASE_SSL=false

Each developer/server should copy this:
cp .env.example .env
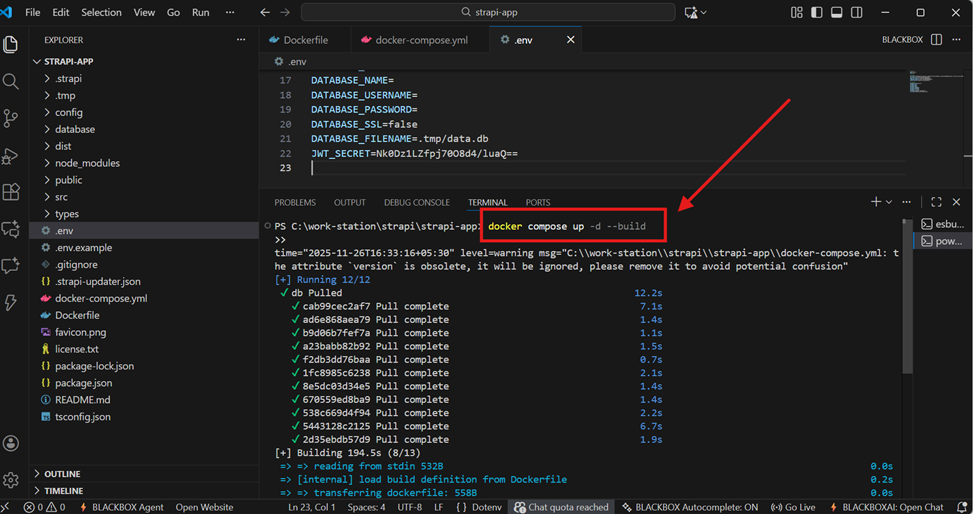
Step 6.Start Everything:-
From inside your project folder:
docker compose up -d --build
Now you have:
- Nginx run on : http://localhost:8080
- Strapi admin panel run on: http://localhost:8080/admin
- Postgres container running inside Docker
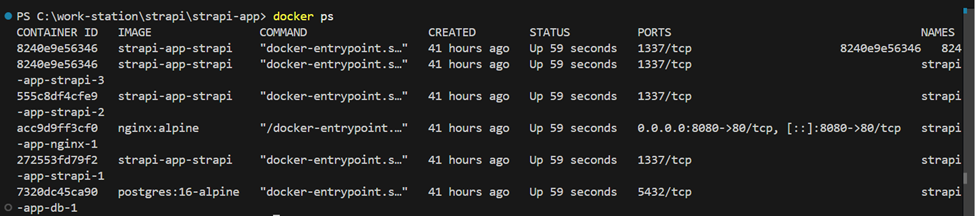
Check with:
docker ps
7.Enable Load Balancing (Scaling Strapi):-
By default you have one Strapi container.To simulate real load balancing:
docker compose up -d --scale strapi=3
Now:
- strapi-app-strapi-1
- strapi-app-strapi-2
- strapi-app-strapi-3
- All receive requests through Nginx.
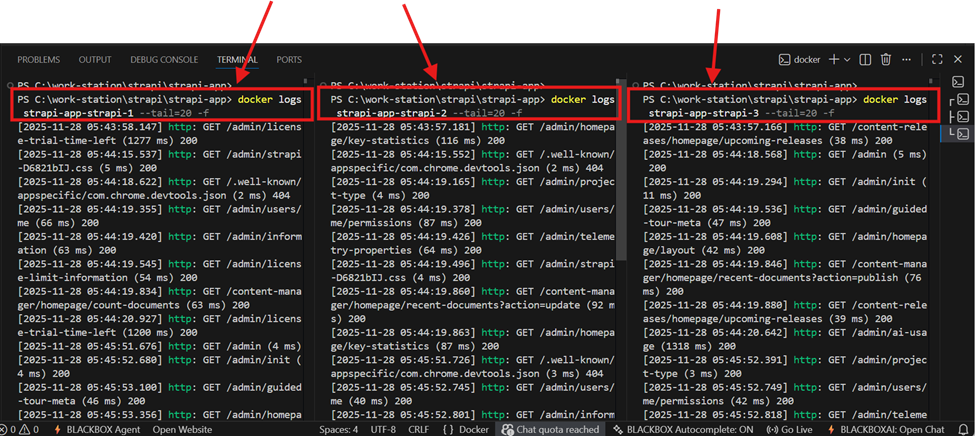
Confirm balancing
Run logs:
- docker logs strapi-app-strapi-1 --tail=20 -f
- docker logs strapi-app-strapi-2 --tail=20 -f
- docker logs strapi-app-strapi-3 --tail=20 -f
Step 8.Deploying on Any Server:-
Deployment is extremely simple:
1. Download Docker and install it from below URL
   (URL: https://www.docker.com/products/docker-desktop/)

2. Clone your repo
     git clone <your-repo>
     cd your-repo

3. Add .env
     cp .env.example .env   (Copy env)

4. Start server
     docker compose up -d --build
That’s it.
Your load-balanced Strapi app is now running on your server.


Conclusion:-
You now have a clean, easy-to-run Strapi setup using Docker with:
✔ Strapi running in containers
✔ Postgres database
✔ Nginx load balancer
✔ Horizontal scaling support
✔ A setup any developer can run instantly
✔ A solid architecture for real projects or learning
This environment works the same on Windows, macOS, Linux, cloud servers, and local machines, making it fully portable and ready for production.

Related Blogs


Read More