How to Build a Content Score App for SitecoreAI Pages Using the Marketplace SDK
In this blog, I'll show how I built Content Score, a Sitecore Marketplace app that checks the page an author is editing and gives it an SEO, accessibility and content-quality score, right inside the Pages editor.
The idea is simple: authors should not have to publish a page and run an external audit tool to find out that the meta description is missing or an image has no alt text. They should see it in the editor, while they are still working on the page.
Below are the step-by-step details, from creating the app in App Studio to writing the code and publishing it in the Marketplace. To capture every screen, I created a fresh app called Content Score Demo. The code snippets are short, simplified examples of the key parts, so you can apply the same approach in your own app.
Prerequisites
- Access to a SitecoreAI (XM Cloud) environment and the Sitecore Cloud Portal
- Permission to use App studio in your organization (Organization Admin or Owner)
- Node.js 20+ and basic knowledge of Next.js / React
- A Vercel (or any other hosting) account for the final deployment
What the app does
When an author opens a page in Pages and opens Content Score from the context panel, the app:
- Reads the current page (ID, name, path, language) from the Pages host.
- Fetches the page fields and all component datasource fields through the Authoring GraphQL API.
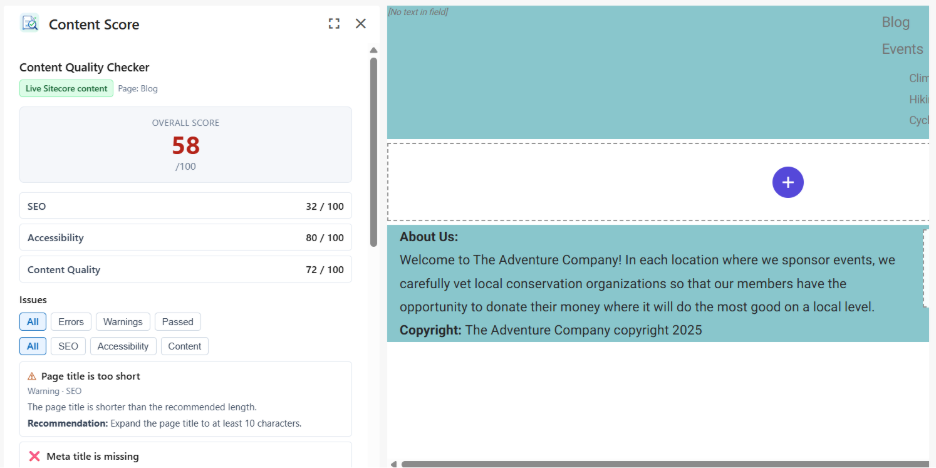
- Runs a set of checks and calculates an overall score plus separate SEO, Accessibility and Content Quality scores.
- Lists every issue with a recommendation, with filters for Errors / Warnings / Passed and by category.
It is read-only. It never creates, updates or publishes anything in Sitecore.
Step 1: Create the app in App Studio
In the Cloud Portal, open App studio from the top menu. It lists every app your organization has created, with its type (Custom or Public) and status. Click Create app in the top-right corner.
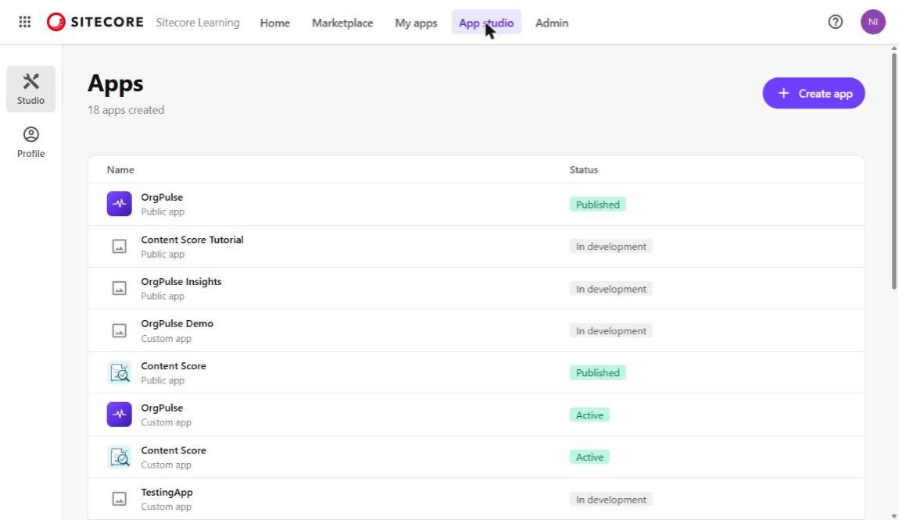
App studio – list of apps and the Create app button
The Create app dialog asks for two things: the app name (up to 50 characters) and the type of app.
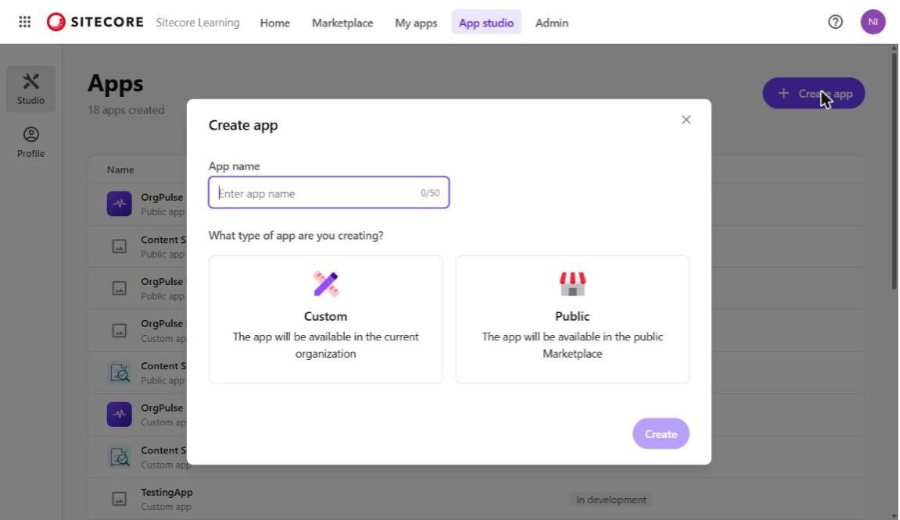
Create app dialog
| App type | Who can use it | When to choose it |
| Custom | Only your current organization | Internal tools, and while you are still building and testing |
| Public | Any organization, through the public Marketplace | When you want to list the app in the Marketplace (needs a listing and submission) |
I entered Content Score Demo and selected Custom, because I first wanted to build and test the app inside my own organization.
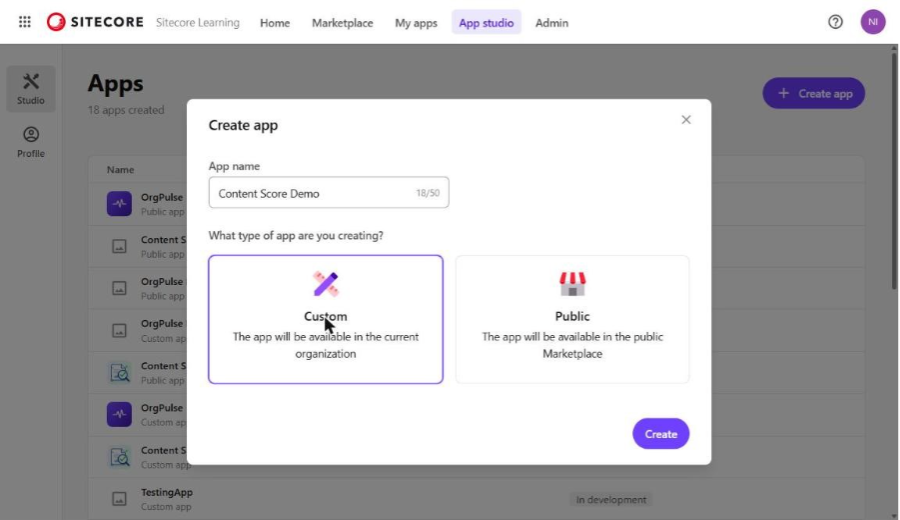
App name entered and Custom selected
After clicking Create, App Studio confirms that the app is created. Click Configure app to continue.
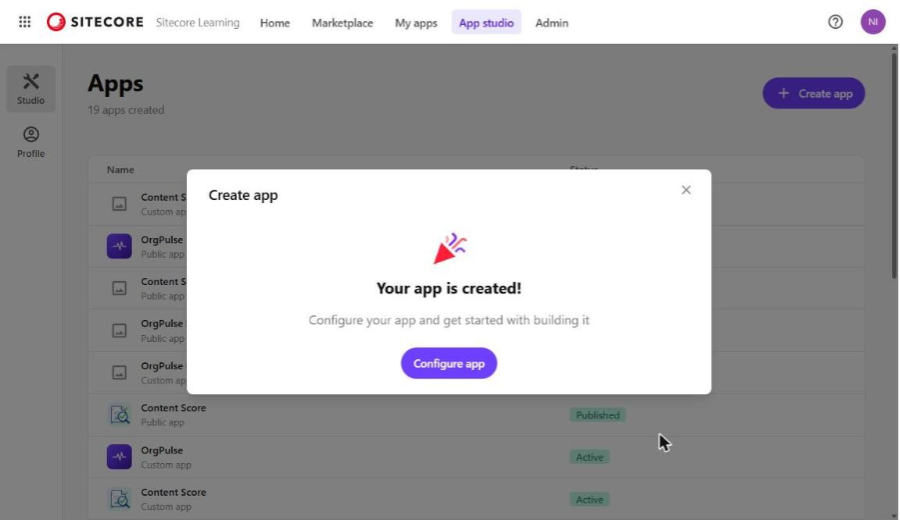
Your app is created! – Configure app
Step 2: Choose the extension point
The configuration page opens with the app in In development status. On the right you can see the App ID and the Organizations that can install the app. The first section, Extension points, decides where your app appears inside Sitecore:
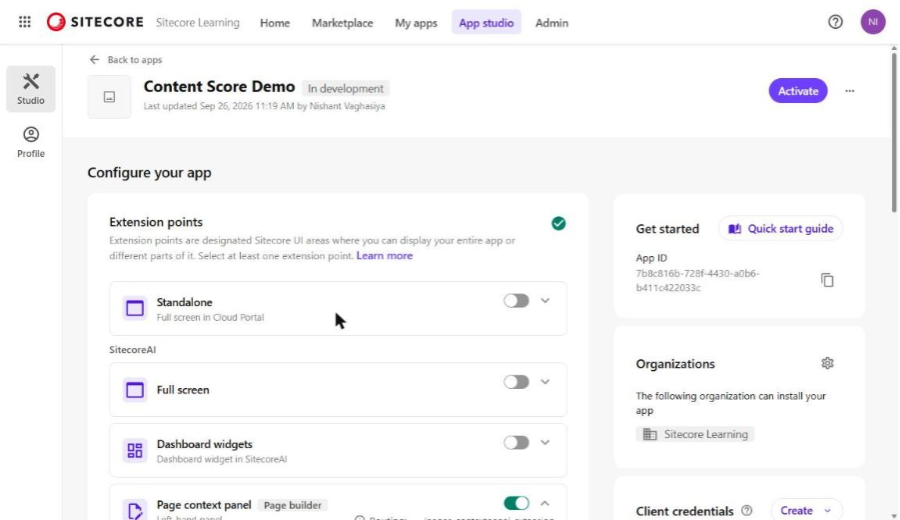
Configure your app – Extension points, App ID and Organizations
| Extension point | Where it shows up | Good for |
| Standalone | Full screen in Cloud Portal | Org-level tools, reports |
| Full screen | Full screen inside SitecoreAI | Bigger tools that need the whole screen |
| Dashboard widgets | SitecoreAI dashboard | Small summaries and KPIs |
| Page context panel | Left-hand panel in Page builder | Anything about the page being edited |
| Custom field | A field in the right-hand or left-hand panel | Custom field editors (color picker, etc.) |
Content Score is all about the current page, so I switched on only Page context panel. Expand it to see the Display name (it defaults to the app name) and the Route URL, which defaults to /. Click the pencil icon and change the route to match the folder in the Next.js app:
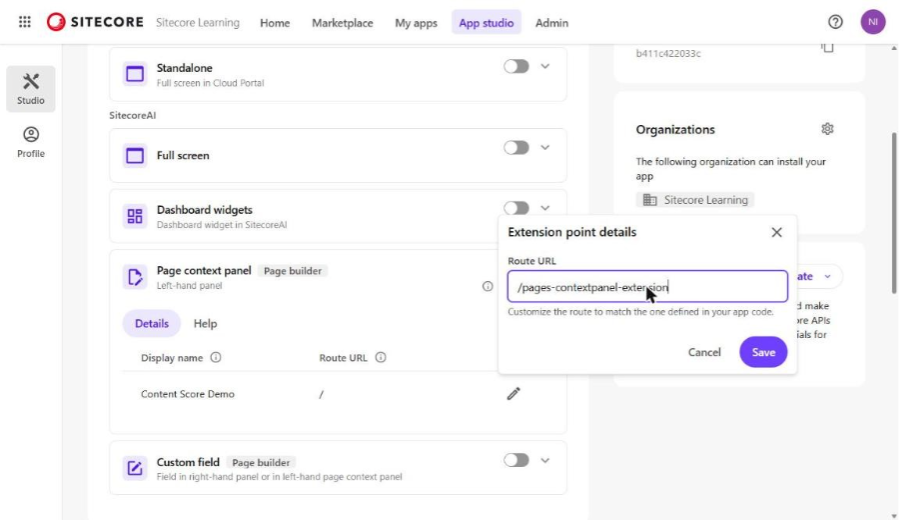
Extension point details – Route URL
After saving, the extension point shows Routing: …/pages-contextpanel-extension:
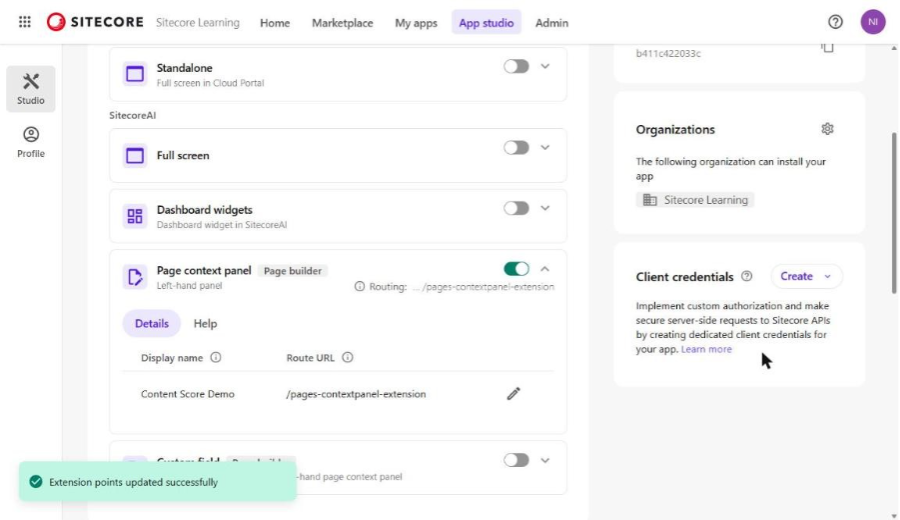
Page context panel enabled with the route URL
Note: The route is appended to the Deployment URL. With the Deployment URL https://sitecore-content-score.vercel.app, Pages loads https://sitecore-content-score.vercel.app/pages-contextpanel-extension inside the panel.
Step 3: Select API access
Scroll down to API access and click Select APIs. Select SitecoreAI APIs and click Save. This one option gives the app access to several APIs, including the Authoring and Management GraphQL API that Content Score uses.
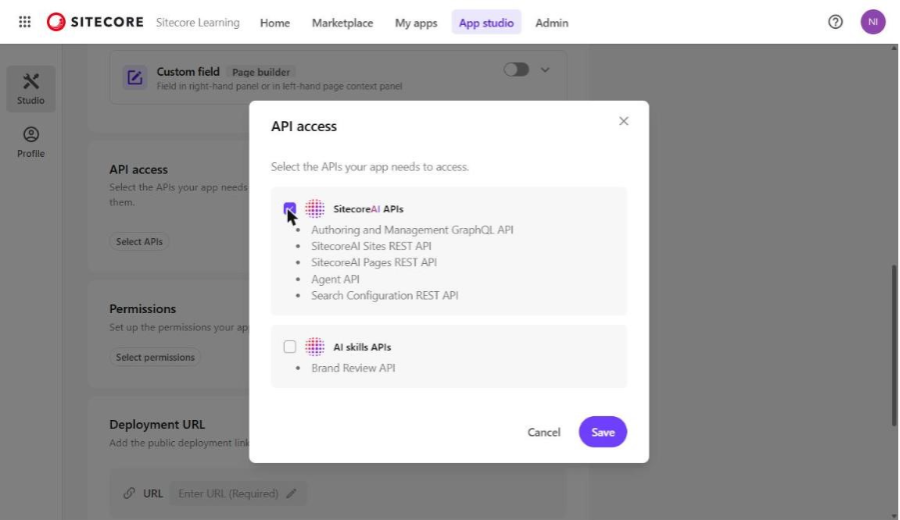
API access – SitecoreAI APIs selected
This one caught me at first. Reading the current page (pages.context) works without any API access, because the Pages host sends that information directly. But to read field values, the app has to call the Authoring GraphQL API, and that needs SitecoreAI APIs selected here. Without it, the app gets no Context ID and every GraphQL call fails.
You don't need AI skills APIs (Brand Review) for this app.
Step 4: Check the permissions
Permissions controls what the app's iframe is allowed to do in the browser: open pop-ups, copy to or read from the clipboard, and download files.
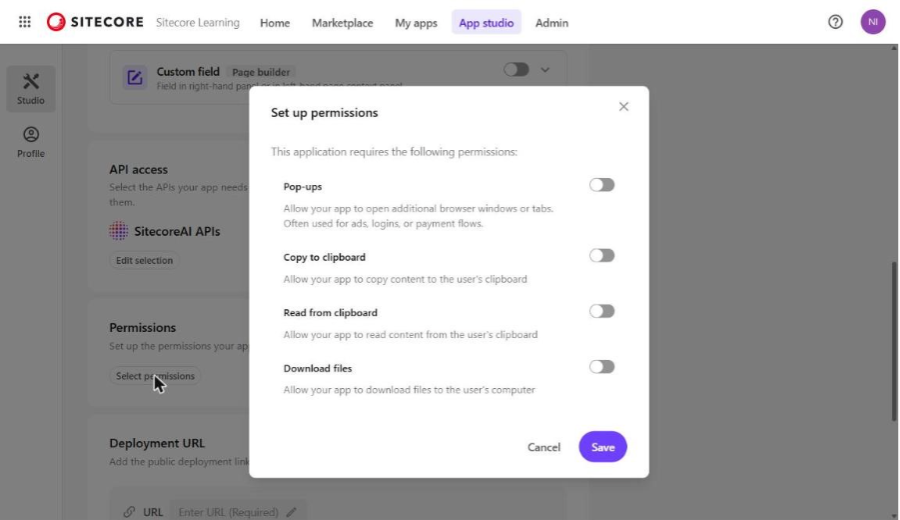
Set up permissions dialog
Content Score only reads and displays data, so I left all of them off and clicked Cancel. Turn on only what your app really needs, for example Copy to clipboard if you add a "Copy report" button. I also left Client credentials empty, because the app makes all its calls through the SDK and doesn't need its own server-side credentials.
Step 5: Add the Deployment URL and logo
The last section is the Deployment URL, which is required. This is the base URL Sitecore loads the app from. While developing, you can use http://localhost:3000, and Pages will load the app running on your machine. I pointed it to the deployed app on Vercel:
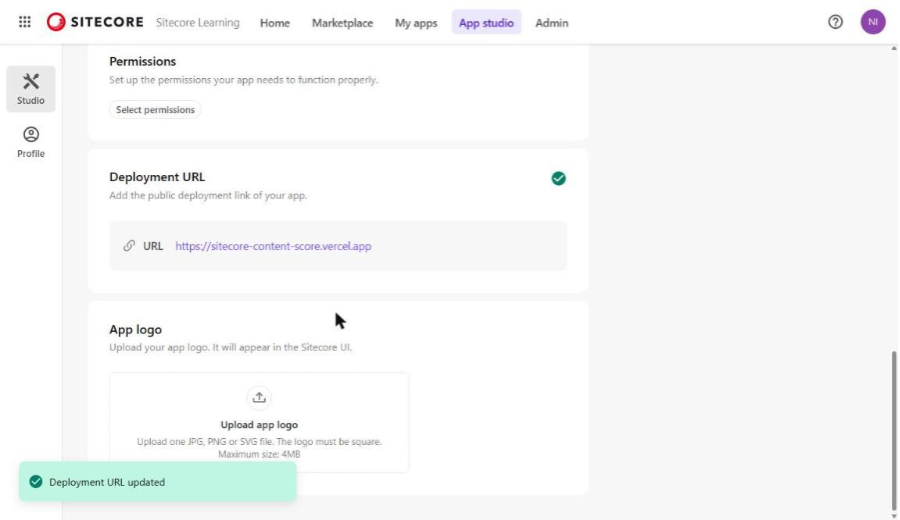
Deployment URL saved, with the App logo section below
Below it, you can upload an App logo (square JPG, PNG or SVG, up to 4 MB). It appears wherever Sitecore shows the app, so it's worth adding one before you share the app with authors.
That's all the configuration. The app is still In development. We'll activate it after the code is ready (Step 13).
Step 6: Set up the Next.js project
Sitecore provides a marketplace-starter repository on GitHub with a Next.js app that already has one folder per extension point. I started from that:
git clone https://github.com/Sitecore/marketplace-starter.git content-score
cd content-score
npm install
npm run dev
The starter has one folder per extension point. Since this app only uses the Page context panel, you can delete the other extension folders and keep only pages-contextpanel-extension. That folder name must match the Route URL set in Step 2.
While developing, set the Deployment URL from Step 5 to http://localhost:3000. Pages will then load your local app in the panel, so you can see changes without deploying.
Note: Opening http://localhost:3000/pages-contextpanel-extension directly in the browser shows nothing useful. The SDK needs the Sitecore host around it, so always test from inside Pages.
Step 7: Initialize the Marketplace SDK
The app talks to Sitecore through two packages: @sitecore-marketplace-sdk/client (required for every Marketplace app) and @sitecore-marketplace-sdk/xmc (adds the SitecoreAI / XM Cloud APIs). The starter already includes both.
The starter already contains a small hook that initializes the SDK. The important part is the init call. target: window.parent tells the SDK to talk to the Sitecore page that hosts our iframe, and modules: [XMC] enables the XM Cloud APIs:
import { ClientSDK } from "@sitecore-marketplace-sdk/client";
import { XMC } from "@sitecore-marketplace-sdk/xmc";
client = await ClientSDK.init({
target: window.parent,
modules: [XMC],
});
Authentication is handled by the host. The app has no login screen and never sees a password.
Step 8: Read the current page
In the panel page, make two queries once the client is ready:
- application.context gives the app details, including the Context ID needed for GraphQL.
- pages.context gives the page currently open in Pages. With subscribe: true, onSuccess fires again every time the author switches to another page, so the score always matches what's on screen.
client.query("application.context").then((res) => setAppContext(res.data));
client.query("pages.context", {
subscribe: true,
onSuccess: (ctx) => setPagesContext(ctx), // fires again on page change
});
pagesContext.pageInfo has the page id, name, path, language and a presentationDetails string. There are no field values in it, which is why the next step is needed.
Step 9: Fetch page content with Authoring GraphQL
Most of the visible content on a SitecoreAI page doesn't live on the page item. It lives in the datasource items of the components. So the app reads both:
- The page item itself (Title, Meta Description, etc.)
- Every datasource listed in pageInfo.presentationDetails
Both use the same GraphQL query, sent through the xmc.authoring.graphql mutation:
const ITEM_QUERY = `
query GetItem($itemId: ID, $path: String, $language: String!) {
item(where: { itemId: $itemId, path: $path, language: $language }) {
name
path
fields(ownFields: false, excludeStandardFields: true) {
nodes { name value }
}
}
}`;
const sitecoreContextId = appContext.resourceAccess?.[0]?.context.live;
const res = await client.mutate("xmc.authoring.graphql", {
params: {
query: { sitecoreContextId },
body: { query: ITEM_QUERY, variables: { itemId, language } },
},
});
Note: Use ownFields: false. With true, you only get fields defined on the page's own template, and fields like Title or Meta Description usually come from a base template, so they would be missing.
presentationDetails is a JSON string. I parse it and collect every dataSource value from the renderings. A datasource can be a GUID, a full /sitecore/... path, or a local:/Data/... path that is relative to the page, so each one is converted before querying:
function toWhere(ds: string, pagePath: string) {
if (ds.startsWith("local:")) return { path: pagePath + ds.replace("local:", "") };
if (ds.startsWith("/sitecore")) return { path: ds };
return { itemId: ds };
}
All fields from the page and its datasources are combined into one list and passed to the checks.
Step 10: Write the checks
Each check is a small function that returns a result object: category, pass/fail, severity (error or warning), weight and a recommendation. Here is the alt-text check. Image fields are stored as XML (<image mediaid="..." alt="..." />), and rich text can contain <img> tags, so both are checked:
const imageFields = fields.filter(isImageField);
const missingAlt = imageFields.filter((f) => !/\balt="[^"]+"/i.test(f.value));
return {
id: "a11y-alt",
category: "accessibility",
title: "All images have alt text",
passed: missingAlt.length === 0,
severity: "error",
weight: 3,
recommendation: `${missingAlt.length} image(s) have no alt text.`,
};
These are the checks I used for this example:
| Category | Check | Severity |
| SEO | Page title is available | Error |
| SEO | Title is 30–60 characters | Warning |
| SEO | Meta description is available | Error |
| SEO | Meta description is 70–160 characters | Warning |
| SEO | Page name is URL-friendly (lowercase, hyphens) | Warning |
| Accessibility | All images have alt text | Error |
| Accessibility | Links have descriptive text (no "click here") | Warning |
| Accessibility | Heading levels are in order (no H2 → H4) | Warning |
| Content | Page has at least 300 words | Warning |
| Content | No placeholder text (Lorem ipsum, TODO, TBD) | Error |
| Content | Average sentence length is under 25 words | Warning |
Field names differ between projects (Title, MetaTitle, PageTitle…), so the SEO checks look for fields by a name pattern instead of one fixed name.
Step 11: Calculate the score
Each category score is the weighted percentage of passed checks. The overall score is the average of the three categories:
function categoryScore(checks: CheckResult[], category: Category) {
const list = checks.filter((c) => c.category === category);
const total = list.reduce((sum, c) => sum + c.weight, 0);
const earned = list.filter((c) => c.passed).reduce((sum, c) => sum + c.weight, 0);
return total ? Math.round((earned / total) * 100) : 100;
}
const overall = Math.round((seo + accessibility + content) / 3);
For example, SEO 80, Accessibility 72 and Content Quality 92 give an overall score of 81. Weights make a missing meta description (3) hurt more than a slightly long title (2).
Step 12: Build the panel UI
The context panel is narrow, so the UI is kept to one column:
- The overall score at the top, colored green (80+), orange (50–79) or red (below 50)
- One row per category with its score
- An Issues list with two filter rows: All / Errors / Warnings / Passed, and All / SEO / Accessibility / Content
- A Re-analyze button, so authors can check again after editing without switching pages
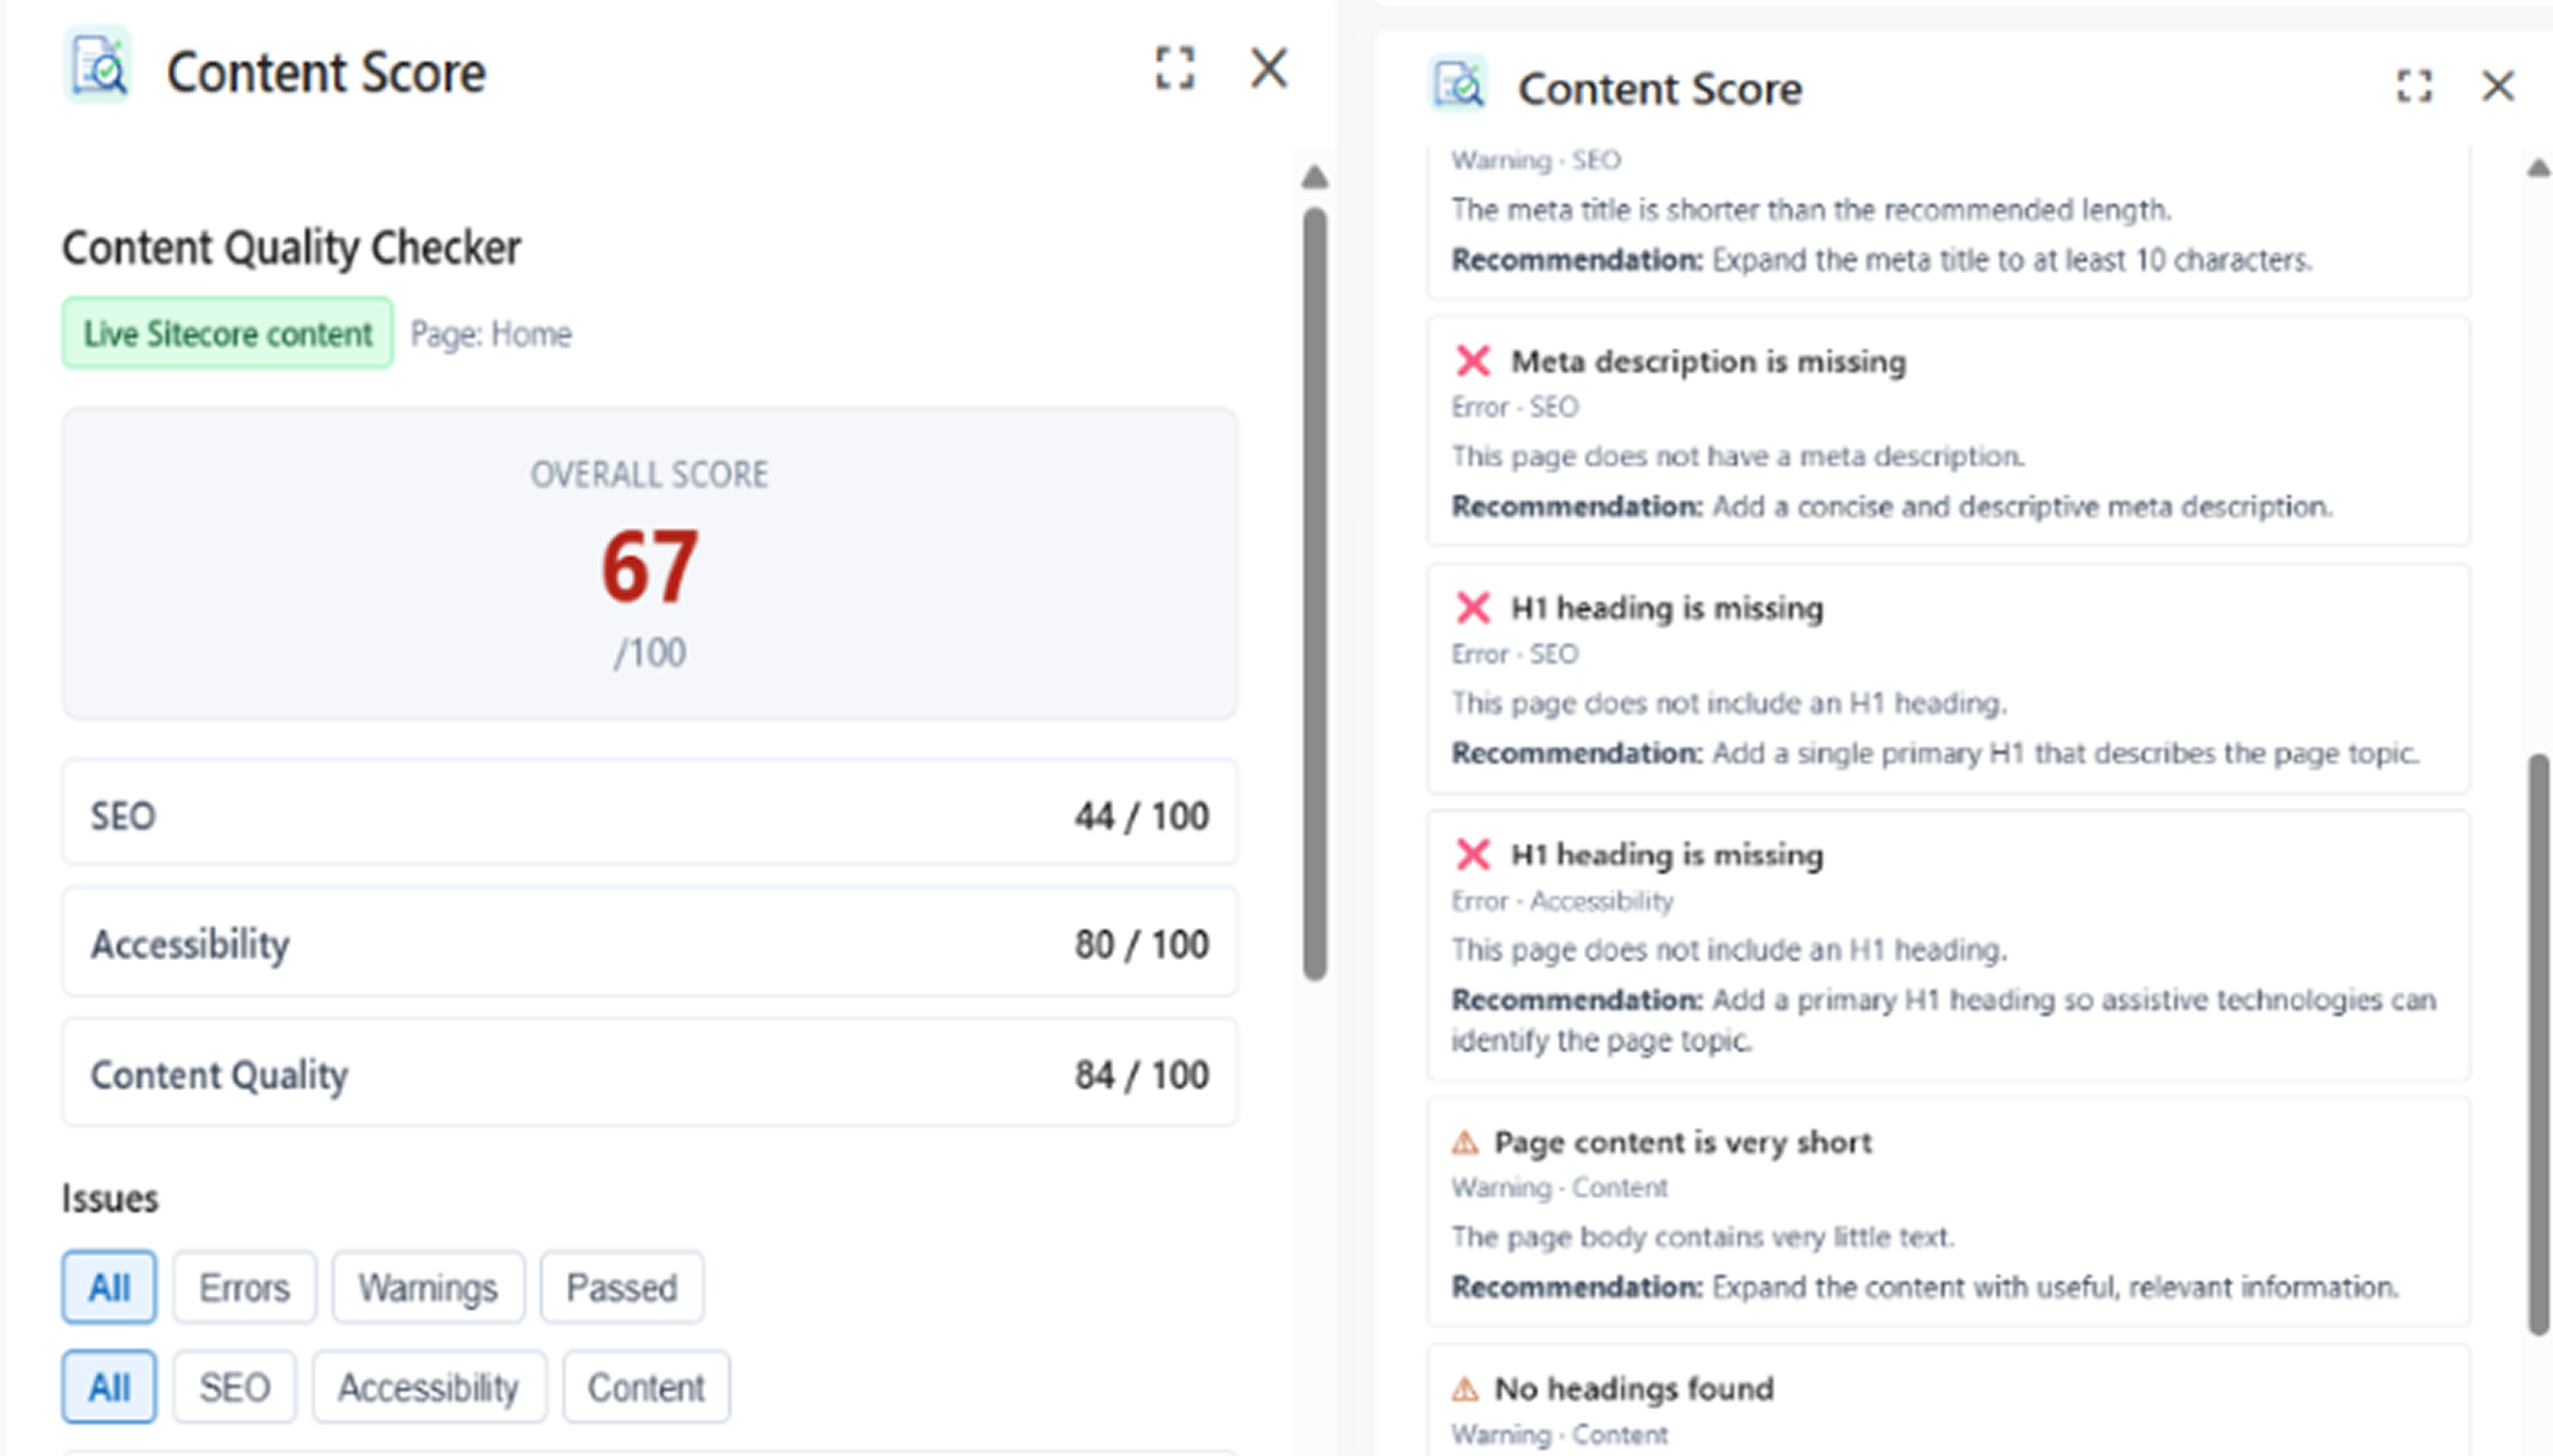
Step 13: Activate and test in Pages
A custom app stays In development until you activate it. When the code is ready, click Activate in the top-right corner of the app page. The status changes to Active, and the app becomes available to the organizations listed under Organizations.
Then test it:
- Open a SitecoreAI environment and open any page in Pages.
- Open Content Score Demo from the context panel on the left.
- Switch to another page. The score should update on its own because of the pages.context subscription.
If the panel stays on "Waiting for page context…", open the browser console. The most common causes are SitecoreAI APIs not being selected (Step 3), a wrong route URL (Step 2), or a Deployment URL where the app isn't running (Step 5).
Step 14: Publish it to the Marketplace (Public app)
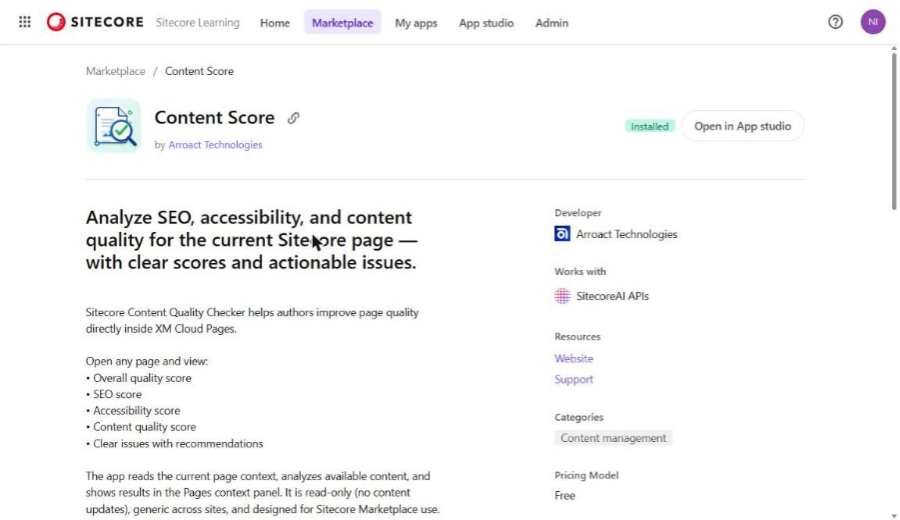
A custom app is enough for internal use. To list the app in the public Marketplace, like the published Content Score app, create it as a Public app. A public app has extra tabs: Overview (headline, description, logo, screenshots) and Submission details, which go through review before the app is Published.
For Content Score, I used this headline:
Analyze SEO, accessibility, and content quality for the current Sitecore page — with clear scores and actionable issues.
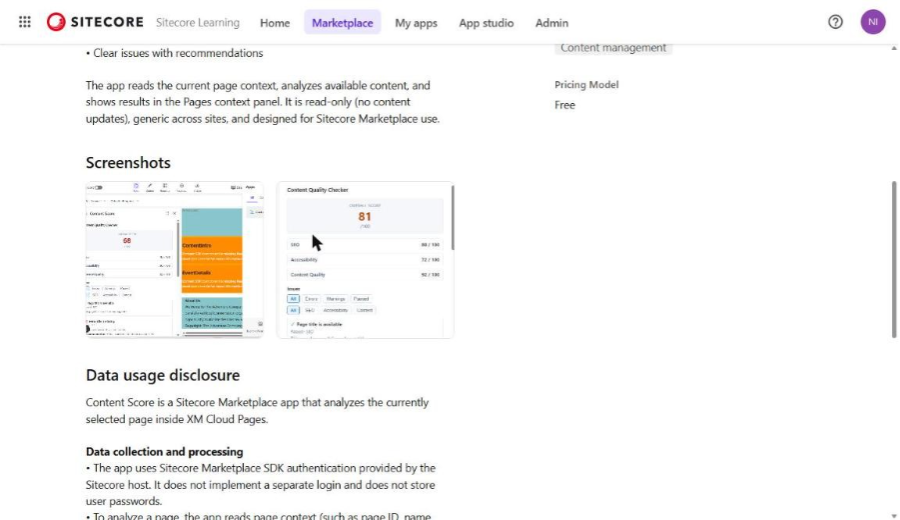
The listing also needs a Data usage disclosure explaining what the app reads and stores. For Content Score, that meant clearly stating:
- It uses the SDK authentication provided by the Sitecore host, with no separate login
- It reads page context and field data through Sitecore APIs
- It is read-only and does not keep a separate content database
- Hosting logs may be retained by the hosting provider (Vercel)
- This version does not use AI or machine learning models
Listing screenshots and Data usage disclosure
Things I learned along the way
| Problem | Cause | Fix |
| GraphQL call fails, no Context ID | SitecoreAI APIs not selected | Select it under API access (Step 3) |
| Title / Meta Description not found | ownFields: true hides base-template fields | Use ownFields: false |
| Score ignores most of the page text | Content lives in datasources, not the page item | Parse presentationDetails and query each datasource |
| Some datasources return nothing | local: paths are relative to the page | Prefix them with the page path |
| Blank screen on localhost | The SDK needs the Sitecore host | Always test from inside Pages |
Where this is useful
- Content teams that want a quick quality check before sending a page for approval
- Multi-site setups where many authors create pages and consistency is hard to keep
- Catching accessibility issues (missing alt text, vague links) early, instead of in a later audit
- As a starting point for your own Marketplace app: the SDK setup, page subscription and GraphQL part are the same for most Page context panel apps
This is how I built Content Score as a Sitecore Marketplace app. Most of the work was not the scoring logic itself, but understanding where the content actually lives in a SitecoreAI page and how to reach it through the SDK. Once that part is clear, adding new checks is just another small function.

Related Blogs

A few months ago, I wrote about building OrgPulse, my first Sitecore Marketplace app.…
Read More
Introduction In a headless SitecoreAI implementation, Sitecore manages content and page…
Read More
Sitecore's history of headless development has had a number of phases. JSS started out…
Read MoreArroact is ready to help you grow.
Our Office

Westface, 519/520, Bhagwat Bungalows Rd, Thaltej, Ahmedabad, Gujarat 380059


Pay us a visit for a cup of coffee. We’ll be more than happy to welcome you.